Monday, February 29, 2016

Case Study 2/29/2016 How To Create High Quality Online Videos Using Affordable Software!

Hello everyone and welcome to yet another online teaching case study! In this weeks case study, we are going to be discussing: How To Create The Highest Quality Videos Possible For Your Online Video Courses!
I will be discussing three main areas and showing you specific examples from my own online courses! The three main areas we will be discussing in this post are:
1) What Video Editing Software You Should Look At Investing In To Create High Quality Videos
2) The Benefits and Differences Between Filming Indoors & Outdoors
3) Taking Your Videos To The Next Level By Adding Text/Pictures/Overlay
Let’s get started!
We are first going to be discussing What Video Editing Software You Should Use and Invest In.
When I first started teaching online I used quicktime screen capture software (Mac computer, free software) and a Blue Snowball USB microphone.
I also used iMovie to edit the screen capture videos (free Mac Editing Software)
Needless to say these were the absolute bare essentials to creating an online video course. In the past year my video editing skills and video recording skills have evolved immensely!
I have invested in using a new video editing software called Final Cut Pro X! They have a 30 day free trial and then after that it costs $299.00 to buy the full version.
Without going into to much detail about the specifics of how Final cut Pro works, this new editing software has allowed me creating amazing looking videos shot form all around the world! Here are a few examples of Finished videos with Final Cut Pro X! 
I highly recommend using Final Cut Pro X as a vital investment into creating professional looking videos for your online courses!
If you are a Windows user (or Mac User) another comparable software editing system is Camtasia Studio! I personally have not worked with this video editing software, but have heard very good things and have seen some excellent videos edited using this software.
Camtasia also has a free trial option and costs right around the same as Final Cut Pro X does for the full version ($299.00 for Camtasia 8)
2) The Benefits and Differences Between Filming Indoors & Outdoors
Now that we have an idea of what software editing program we need its time to go out and start shooting some videos! I have create a whole blog post on which Cameras I recommend, so we will skip that for now, but I wanted to share my experience filing indoors (with a green screen) vs. filming outdoors (in nature/public places)
Filming indoors:
The Pro's
There are a lot of different reasons why filming indoors is a great way to create high quality videos. First, you really do not have to worry about any weather conditions, (unless your power get cut off) or microphone issues (as long as you are in a quite room without background noises). Second, filming indoors can be very comfortable as most people will be likely filming in their own homes or a professional studio. Third, setting up and recording should be easy once you have everything in line and set up! Here is an example of me using my green screen indoors! It was worth the effort to learn these skills!
The Con's
Setting up and getting all of the lighting/equipment to work perfectly can be a pain in the neck. I remeber it taking me hours to finally have everything set up the way I liked it the first time I filmed indoors! Second, you are limited to what you can do indoors. It's not like you can move around a lot on screen because you are in a fixed area. Third, you may only be able to film during certain times (maybe you live with a roommate/family/ect and you cannot film in a certain area at a certain time).
Filming Outdoors: 
The Pro's
You can really engage and inspire your students by filming outdoors! Some of my bestselling courses have multiple lectures where I film outdoors! You also have a lot of flexibility when filming outdoors! You can move around more, get different angles, and shoot almost anywhere at anytime! Here is an awesome example of me filming outdoors!
The Con's 
Weather can always be a big factor when trying to film outdoors. When its cloudy, windy, or even rainy/cold, mother nature can ruin your video before you even begin! Always be aware of the current weather before starting your video shoot!
3) Taking Your Videos To The Next Level By Adding Text/Pictures/Overlay
A wonderful way to engage your students and enhance your videos is byAdding Text/Pictures/Overlay to your videos! Using your new software there may be multiple different ways to do this, however let me show you a few examples from my own videos! 
Here you see I have added simple text "Special Bonus" to my video to have it look more professional!
In this picture I have a video inside of a vide using the picture in picture option!
These are just a few way you can make your videos more engaging, professional, and take them to the next level!
I hope you have enjoyed this weeks case study! There are many ways to begin teaching online, but this should give you some great ideas that have worked for myself and many other online instructors! Stay tuned next week were I discuss more online teaching strategies.
Thank you for reading our blog post today! If you have any questions please feel free to post your comments below!
Also, you can check out all of my blog posts for FREE by going to:
Sincerely,
Joe Parys
Monday, February 22, 2016

Case Study 2/22/2016 - The New Udemy Review System is Here!

Hello everyone and welcome to yet another online teaching case study! In this weeks case study, we are going to be discussing The New Udemy Review System!
I will be discussing three main areas and showing you specific examples from my own online courses! The three main areas we will be discussing in this post are:
1) What Are The New Changes To The Review System
2) How Can We Work With The New Review System To Create A Win/Win Situation 
3) How To Continue To Create High Quality Courses To Combat Negative Reviews
Let’s get started!
1) What Are The New Changes To The Review System
The first major change that both Jerry and I have noticed is that you can now reply DIRECTLY to someones review! This is a great new feature! In Jerrys last email he shows you exactly how to do this. Incase you missed it, here are the screenshots below!
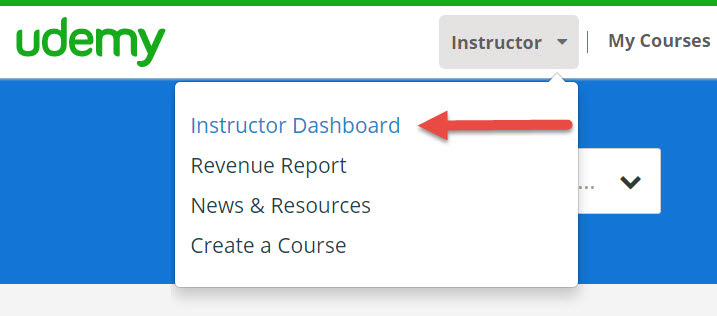
How do you get to reviews? Go to instructor dashboard on the top bar next to my courses.
Next select the reviews tab
You can then filter based upon star levels
Every review has a "respond" button on it! This makes it very easy to respond directly to that persons review! 
Here is an example of a review that I have responded to in my newest android course!
The second thing that I noticed is that students can now rate courses with .5 or half star ratings! I got one of my first half star ratings just a few hours ago!
4.5 Stars!
The third major change to the review system is that Udemy now has 3 different checkpoints in which it will specifically be asking your for a review! (a beginning, middle, and ending checkpoint).
Here is what that looks like at the very first checkpoint which takes place very early on in the course!
These changes have instantly boosted and created more reviews almost overnight! This is a very exciting time to see how this new review system will work in the future months to come!
2) How Can We Work With The New Review System To Create A Win/Win Situation 
The best way to maximize your experience as a Udemy instructor is to work WITH the new review system, instead of resisting AGAINST it. This creates a WIN/WIN situation for Udemy and yourself as the instructor!
Here are a few tips:
1) Be adaptable and willing to work with the new system. Don't fight against it!
2) Use the new review system to your advantage! Spend the time getting to know/learn the new system
3) Focus on the areas you like about the new system, instead of the areas that bother you!
Here are some additional suggestions from Jerry Banfield on how to respond to reviews to create better situations for everyone!
“Here are a few tips for responding to reviews generally based on what I am doing today.
  • Responding to the top negative review on each course is my first priority. With 47 courses and 132 one and two star reviews, not all reviews are created equal. The reviews buyers are most likely to see are the most important for me to respond to because that is where I can hope to most effectively reach a potential student. This means now I will try to respond to every new one and two star review as soon as I see it.
  • Responding to older reviews that are not on the first page of reviews can be done steadily over time until every one of them has a response. Some buyers will read as many reviews as possible and the older reviews often provide a great chance to convert especially when the response is newer.
  • Responding to a review shows students you are actively watching the course and keeping it updated. This as a buyer is very important for me to see the instructor is participating in the course because I want to know I can get answers to my questions in the course." -Jerry Banfield
3) How To Continue To Create High Quality Courses To Combat Negative Reviews
The key (especially now with this new review system) to getting higher reviews and ratings is to actually go back to the fundamentals and create high quality online videos courses! Also, allowing an abundance of new students to try your course is a great way to boost your reviews! Here are a few tips I will be trying with the new system in place:
1) Allowing lots of free students into my course to drive additional reviews
2) Having my first lectures be of the highest quality to set the tone in the course and give students as great reason to provide 5 star reviews
3) Responding to as many negative reviews as possible and trying to resolve the issues by making my courses better, not by trying to change the reviews opinion! Nothing beats an awesome course :)
I hope you have enjoyed this weeks case study! There are many ways to begin teaching online, but this should give you some great ideas that have worked for myself and many other online instructors! Stay tuned next week were I discuss more online teaching strategies.
Thank you for reading our blog post today! If you have any questions please feel free to post your comments below!
Also, you can check out all of my blog posts for FREE by going to:
Sincerely,
Joe Parys

Tuesday, February 16, 2016

Case Study 2/16/2016 Intermediate Teaching Online Techniques!


Hello everyone and welcome to yet another online teaching case study! In this weeks case study, we are going to be discussing Intermediate Teaching Online Techniques!
This case study was inspired by student feedback for students just getting started teaching online on Udemy!
I will be discussing three main areas and showing you specific examples from my own online courses! The three main areas we will be discussing in this post are:
1) Building Student - Instructor Relationships
2) Promotional Video Strategies
3) Simple Ways To Market Outside of Udemy
Let's Get Started!
1) Building Student - Instructor Relationships
It is absolutely essential to your online teaching success that you are able to build a healthy foundation with your students! TRUST is the key to any relationship, and your students need to be able to trust you. Here are a few strategies I use when building relationships with my students:
a) Be available and open to communicating regularly with your students
I have had multiple students have exceptional experiences in my online courses because I make the effort to answer their questions and messages in a very timely manner! In fact, I even had one student message me first because the online support was taking days to get back to him! I was able to message him the answer to his question within one hour! Being available really helps build trust with your students!
b) Do your absolute best to answer each question honestly and sincerely
When building trust with your students they can tell when you are not being authentic and genuine. This is important because when you go to answer your students questions you do not want to come off sounding fake or phony. That is what I do my best to answer each question honestly and sincerely, even if I do not know the exact answer! Admitting we do not know everything also builds trust!
c) Enjoy the interactions!
I know some instructors hate answering question and if you serve a lot of students it can become a "burden" if you let it. However, I actually enjoy taking the time to get to know my students! This also allows me to better serve them and create better content in the future :)
2) Promotional Video Strategies
After creating more than 30+ Udemy courses I have begun to see how important your promotional video is! Did you know students are 5X more likely to enroll in your course if you have a good promo video!
Here are the statistics from Udemy:
So if the promotional video is so important, how do we make a really great one? Well, Udemy has a great guide to help us with this! All you have to do is click on the "promo video guide" after clicking on the "promo video" tab!
Here are a few of their recommendations:
"1) Welcome & Instructor Intro
Give a 1-sentence intro to the course then tell the student why you're a credible instructor.
2) Benefits
Describe the benefits of the course and what students will be able to do after completing it.
3) Ideal Student Description
Describe your target student.
4) Thank You & Call to Action
Call the student to enroll in the course or try the free preview if they want to explore further."
3) Simple Ways To Market Outside of Udemy
Student Question:
"Joe,
I just launched my second class on udemy and am looking to drive some traffic to it. My first class is a free class and I have about 2800 students with good reviews. Since my first class was free I can't do a promotional message to get the word out. What are some good ideas to drive people to my new class?"
_______________
This is an excellent question! Here are few suggestions that have helped me in driving in more traffic to my Udemy course! I now have 35 of them and am serving more than 80,000+ students!
1) Try uploading your videos to YOUTUBE for coupon links back to your Udemy courses!
Youtube is currently the #3 website in the world and has millions of users watching videos everyday! This is a great place to begin attracting students into your online course!
2) Try the Udemy studio!
The Udemy Studio Facebook group has more than 36,000+ members currently and they allow you to put free coupons of your course in the studio note section! This allows many students to try your course for free, share it with friends, and get thousands of students enrolled in your course! Just type in "Udemy Studio" into the search option on Facebook, click "join group" and wait for Udemy to add you :)
3) Free Facebook Udemy groups!
There are many free coupon and discount coupon facebook groups that allow you to post your Udemy free coupons (to your piad courses) on their pages! All you have to do is obey the rules, participate, be friendly, and post your coupons once your course is created! I would try the following groups!
Udemy coupon guru
Udemy 80% or less coupons
Udemy Free Coupons, Promotions, Page
Udemy $1-$9 Coupons
Udemy $20 and Under Coupons
And there are many more!
4) You can also try other coupon websites!
www.retailmenot.com has an awesome Udemy coupon section! Just type in "Udemy" to the retail me not search option and add in your coupons. There are also sites like www.coupontrump.com, www.onlinecoursecoupons.com and many more to help you get started!
Thank you for reading our blog post today! If you have any questions please feel free to post your comments below!
Also, you can check out all of my blog posts for FREE by going to:
Sincerely,
Joe Parys

Tuesday, February 9, 2016

Case Study 2/8/2015 A Beginners Guide To Teaching Online - What I Wish I Knew When I First Started Teaching Online!

Hello everyone and welcome to yet another online teaching case study! In this weeks case study, we are going to be discussing A Beginners Guide To Teaching Online - What I Wish I Knew When I First Started Teaching Online!
This case study was actually inspired by student feedback for students just getting started teaching online on Udemy!
I will be discussing three main areas and showing you specific examples from my own online courses! The three main areas we will be discussing in this post are:
1) How To Set Up My Udemy Instructor Account Quickly and Easily
2) How To Choosing A Topic To Teach Online and When To Launch Your First Course!
3) What Sells Best On Udemy and Other Online Websites!
Lets Begin With Question 1)
1) How To Set Up My Udemy Instructor Account Quickly and Easily 
The easiest way to being setting up your Udemy account for getting paid students is to go to:
Here they will show you step by step how to update your instructor page and add in your Paypal account!
They also show you step by step how to edit your profile and how to change the price of your Udemy courses! This is an excellent tool and will help you easily get started teaching online!
I remeber it taking me more than 1 week to get my profile figured out and I just wanted to hopefully make this process easier for all new instructors!
2) How To Choosing A Topic To Teach Online and When To Launch Your First Course!
When I first began teaching online I chose a topic I knew a lot about and had the proof to show for it! This really helped me in creating my first course because it made the whole teaching part easy! I would suggest if you are new to teaching online to start with teaching a subject you know and are passionate about! This will give you momentum to learn, create momentum for your next course, and continue to become a better online instructor. Here is a phrase that I wish I heard early on as an instructor:
"If you are not embarrassed by your first course, you did not start soon enough!"
Here is my first goal setting course:
Now in 2016 I am a little embarrassed by! Why? Because the quality of the videos is lower because my awareness of how to create the videos was low! 
Here is an example of my first course lecture! A powerpoint example!
Now, after creating this course I ended up creating a whole new course on goal setting because I became more aware of how to create higher quality videos!
This course has received higher more 5 star reviews and look at the difference in engagement in the video lecture! It is a night and day difference :)
So what is the message? Try your best to learn as much as you can about how to create amazing videos first and then start creating your online courses! It will save you lots of time and the students will enjoy your courses more!
3) What Sells Best On Udemy and Other Online Websites! 
After creating more than 30+ courses here on Udemy what I have found to sell the best is highly technical courses! This is why I have hired and am working with professionals who know how to create and teach these subjects! Here is an example of my newest course on Android Development! It has enrolled over 8,000+ Students in its first week!
It has also received some very nice reviews because we have condensed the amount of information in the course! The saying "less is more" can definitely apply to online teaching! It's important to get to the point and not waste your students time :)
I hope you have enjoyed this weeks case study! There are many ways to begin teaching online, but this should give you some great ideas that have worked for myself and many other online instructors! Stay tuned next week were I discuss more intermediate teaching strategies and how to begin making your first online sales!
Thank you for reading our blog post today! If you have any questions please feel free to post your comments below!
Also, you can check out all of my blog posts for FREE by going to:
Sincerely,
Joe Parys

Monday, February 1, 2016

Case Study: 2/1/2016 How To Increase Student Engagement In Your Online Courses: Part II!

Hello everyone and welcome to yet another online teaching case study! In this weeks case study, we are going to be discussing Part II as a follow up of last weeks student engagement and how it affects your online courses.
This case study was actually inspired by student feedback on how to engage more students and to have them participate more in our online courses.
I will be discussing two main areas to help you engage more of your students and show you specific examples from my own online courses! The three main areas we will be discussing in this post are:
1) Answer Every Single Discussion Question Your Students Post In Your Courses In A Timely Manner!
2) Ask Follow Up Questions and Is Students Can Provide Additions Feedback By Posting A Review!
Lets Begin with Question #1
1) Answer Every Single Discussion Question Your Students Post In Your Courses In A Timely Manner! 
As a teacher it is very important to listen to your students especially when they have questions. I know that when my students in the classroom raise their hands they are (for the most time) looking for a deeper understanding and wanting to know more about what I am teaching them. That is why it is very important to listen and try my best to answer the students question. And if I do not know the answer, I openly admit I do not know it, and then do my best to research the students question and answer it at a later time (never more than a day or two!)
The same can be applied online! Here are some examples of me answering all of the questions in my Current Udemy courses! As you can see I have replied to each and every student!
Here is my reply :)
It is also very important to respond as soon as you can, this way the student feel appreciated, that you are engaged, and that you are willing to help the student as well! Nothing engages a student more than showing them you are interested in them getting amazing results in their life! Try your best to answer each student question within a day or so. I answer most of my students questions within the same day or one day later! Choose a time you can commit to sit down and sincerely answer your students questions. It will go a long way! 
Lets Now Transition into Question #2
2) Ask Follow Up Questions and Is Students Can Provide Additions Feedback By Posting A Review! 
One of the best ways to engage your students and to have them help you engage even more students is to simply ask them for additional feedback and if they would be willing to provide you a testimonial or review of your teachings and the course.
By asking your student for feedback they are not only going to be helping you, but also participating more in your course. The student will have to invest not only a little more of their time, but their feelings as well. Some students may not be willing to help write you a review or testimonial, but this strategy of asking for help once I have show/given students help, has allowed me to receive over 1000+ reviews!
The reviews have also helped thousands of other students make decisions to enroll in my Udemy courses! Talk about creating a win win situation!
*Pro-Tip*
If you never ask, you will never receive. Wayne Gretzky once said "you miss 100% of the shots you never take" so don't feel bad about asking your students to provide feedback. Remeber, its a win win situation.
I hope you have enjoyed this weeks case study! There are many more ways to engage your students, but this should give you some great ideas that have worked for myself and many other online instructors!
Thank you for reading our blog post today! If you have any questions please feel free to post your comments below!
Also, you can check out all of my blog posts for FREE by going to:
Sincerely,
Joe Parys